![]() The Pacific War Online Encyclopedia
The Pacific War Online Encyclopedia
|
| Previous: Salween River | Table of Contents | Next: Samarinda |

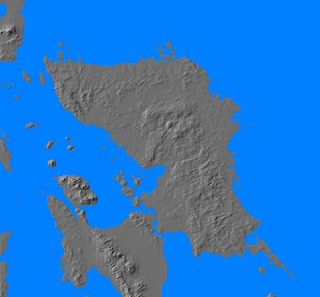
Samar is an island on the northeast end of the central Philippines. It is the third largest island in the archipelago, 200 miles (320 km) long and 110 miles (180 km) across with an area of 5124 square miles (13,271 km2). The island is separated from Leyte, to the southwest, by a shallow strait impassable to oceangoing vessels. It is separated from the Legaspi Peninsula of Luzon by San Bernardino Strait, one of two navigable passages to the central Philippines from the Pacific Ocean. The terrain is low mountains reaching to 2654' (809 meters) in the north-central part of the island.
Samar was almost
completely undeveloped in 1941. However, there was a good road from San
Pedro Bay in the south around the west side of the island, with a spur
through the central mountains to the northeast coast. The southeast
corner of the island had almost no road network or other infrastructure.

U.S. Navy. Via Morison
(1958)
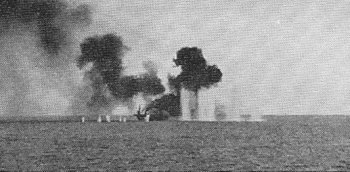
The most desperate battle of the Leyte Gulf campaign took place east of Samar on 25 October 1944. Kurita's Northern Force planned to pass through San Bernardino Strait to form the northern pincer of an envelopment of Allied invasion forces in Leyte Gulf, the southern pincer being provided by Nishimura's Southern Force coming though Surigao Strait.
The Japanese had almost no air cover and were plagued by communications problems, which were further aggravated by battle damage inflicted by Allied air attacks. Ozawa's Mobile Force was supposed to draw off the American carriers so that the surface groups could successfully penetrate Leyte Gulf, but he was unable to attract American attention until 1540 on 24 October. Meanwhile, the Americans had spotted Kurita's force and pounded it from the air, sinking battleship Musashi with a rain of bombs and torpedoes. Nishimura's force was also spotted and attacked, and during the night of 24-25 October 1944, it was virtually annihilated by Kinkaid's 7 Fleet at Surigao Strait.
But Kinkaid's ambush
had drawn almost all the heavy surface
units of 7 Fleet south, and Halsey
meanwhile had finally spotted Ozawa.
Halsey, overestimating
the damage to Kurita's force and believing it was retiring for good,
took off in hot
pursuit of
Ozawa with all his forces. Now it was the Americans whose plans were
thrown into confusion. Halsey had transmitted a contingency plan for
detaching his battle line as Task Force 34 to guard San Bernardino
Strait. However, with Kurita seemingly in retreat, Halsey decided this
was unnecessary. But the original message was the only one seen by
other commanders, and they were left with the
mistaken impression that San Bernardino Strait was being watched.
At 1935 a night reconnaissance flight from Independence found that Kurita's force had returned to a course for San Bernardino Strait. It is unclear why Halsey did not then detach Task Force 34 to cover the strait. Mitscher, possibly smarting from having been bypassed all day by Halsey (who issued orders directly to Mitscher's task group commanders), declined to radio such a recommendation to Halsey. Three of Halsey's task force commanders also wondered at the order, and Bogan went so far as to contact Halsey's staff with the information that the navigation lights in San Bernardino Strait were lit. He was brushed off, and made no further protest. Lee, the battle line commander, correctly deduced that Ozawa's force was a decoy with little striking power, but his signal to Halsey warning that Kurita was likely to come out of San Bernardino Strait was also brushed off. Halsey's failure to guard the strait must be judged one of the great blunders of the Pacific War.
The upshot is that when Kurita turned around after nightfall and
raced through San Bernardino Strait, he found to his astonishment that
the strait was completely unguarded. Kurita's force turned south and,
by first light, it was east of Samar racing south.
At 0549, Kurita spotted masts 28,000 yards (26,000 meters) to the
southwest. These were the escort
carriers and accompanying destroyers
and destroyer escorts of
Sprague's Task Group 77.4.3.
These light forces were conducting antisubmarine
patrol while providing air cover and ground support for the invading
forces. An Avenger on
antisubmarine patrol reported the approaching Japanese at about the
same time, and the Japanese opened fire at 0658. Japanese ship
identification was miserable, and Kurita believed that he was up
against Halsey's fleet carriers
and their cruiser escorts. His
force was just beginning to redeploy from night column formation to
circular antiaircraft
formation, and Kurita ordered "General Attack", which meant that each
ship should charge ahead independently. This threw the Japanese force
into utter confusion. Kurita had lost control of the battle before it
had fairly begun.
The Americans launched
all available aircraft,
then
turned southeast to race away while making smoke and screaming
over the radio for help. But
Kurita's cruisers had at least a 10-knot speed advantage. The American
aircraft attacked Kurita in desperation, at times
making passes with empty guns to distract the Japanese, or dropping
their antisubmarine depth charges
in the path of the ships in hopes of somehow inflicting damage.
Meanwhile, the American destroyer screen performed a suicidal torpedo attack against Kurita while
making smoke to cover the escort carriers. The American attack should
have been brushed off by Kurita's own screen, but according to Ugaki, Kurita had ordered his
his light cruisers and
destroyers to stay to the rear
of his heavier units, in accordance with Japanese battle doctrine. As a
result, the American torpedo attack was far more effective than it had
any right to be, putting torpedoes into at least two cruisers and
causing Yamato to turn north to comb
the wakes of the American torpedoes. This took Kurita clear out of the
battle.
The Americans were within an ace of destruction when Kurita abruptly turned his force around and headed north, at 0811. The reasons for this order remain obscure. Kurita's force had suffered significant damage from the air and torpedo attacks, losing three cruisers, but his force had been sent out on the belief it would likely be annihilated. Kurita claimed long after the war that he knew in his heart that the war was lost, and he could not bear to see his men killed uselessly.
Halsey was severely, and probably justly, criticized for leaving San
Bernardino Strait uncovered. His aggressive pursuit of the enemy
carriers, which left the invasion force relatively unprotected, is in
sharp contrast with Spruance's
actions
at the Battle of the Philippine
Sea, when he was criticized for failing to pursue and remaining
close to his invasion force.
| 5 Fleet
First Strike Force, Main Body (Kurita)
|
|||
| |
Force
"A" (Northern Force) |
||
| BB Yamato |
|||
| BB Nagato | |||
| CA Atago |
|||
| CA Takao | |||
| CA Chokai | Sunk |
||
| CA Maya | |||
| CA Myoko |
|||
| CA Haguro | Severely damaged |
||
| CL Noshiro |
|||
| DD Kishinami |
|||
| DD Hayanami | |||
| DD Asashimo | |||
| DD Akishimo | |||
| DD Hamanami | |||
| DD Fujinami | |||
| DD Shimakaze | |||
| DD Hayashimo | |||
| Force
"B" (Northern Force) |
|||
| BB Kongo |
|||
| BB Haruna | |||
| CA Kumano |
Damaged |
||
| CA Suzuya | Sunk |
||
| CA Chikuma |
Sunk |
||
| CA Tone | |||
| CL Yahagi |
|||
| DD Nowaki |
|||
| DD Kiyoshimo | |||
| DD Urakaze | |||
| DD Yukikaze | |||
| DD Hamakaze | |||
| DD Isokaze | |||
| 7 Fleet,
Task Group 77.4 (Thomas L. Sprague)
|
|||
| Task
Unit 77.4.3 (Clifton Sprague) |
|||
| CVE Fanshaw Bay | Damaged |
||
| CVE Kalinin Bay | Damaged |
||
| CVE Gambier
Bay |
Sunk |
||
| CVE St.
Lo |
Damaged |
||
| CVE White
Plains |
Damaged |
||
| CVE Kitkun Bay | Damaged |
||
| DD Hoel |
Sunk |
||
| DD Heerman | |||
| DD Johnston | Sunk |
||
| DE Samuel B. Roberts |
Sunk |
||
| DE John C. Butler |
|||
| DE Dennis |
|||
| DE Raymond |
|||
| Task Unit 77.4.2 (Felix Stump) | |||
| CVE Natoma Bay | |||
| CVE Manila Bay | |||
| CVE Marcus
Island |
|||
| CVE Kadashan Bay | |||
| CVE Savo
Island |
|||
| CVE Ommaney Bay | |||
| DD Haggard | |||
| DD Franks | |||
| DD Hailey | |||
| DE Richard W. Suesens | |||
| DE Abercrombie |
|||
| DE Leray Wilson |
|||
| DE Walter
C.
Wann |
|||
| Task Unit 77.4.1 (Thomas L. Sprague) | |||
| CVE Sangamon |
|||
| CVE Suwannee | |||
| CVE Santee | |||
| CVE Petrof Bay | |||
| DD McCord | |||
| DD Trathen | |||
| DD Hazelwood | |||
| DE Richard S. Bull | |||
| DE Richard M. Rowell |
|||
| DE Eversole |
|||
| DE Coolbaugh |
|||
References
Dull
(1978)
Hornfischer
(2004)
Morison
(1958)
The Pacific War Online Encyclopedia © 2008-2009 by Kent G. Budge. Index