The Pacific War Online Encyclopedia
|
| Previous: Savige, Stanley G. | Table of Contents | Next: Savory, Reginald A. |
 |
|
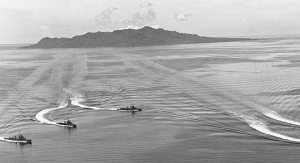
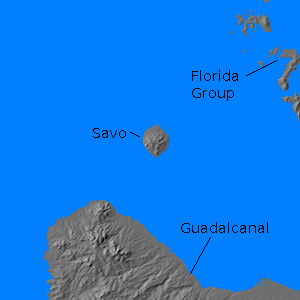
Savo Island (159.813E
9.130S) is a small volcanic island nine miles (14 km)
northwest of Guadalcanal
that divides "The Slot" running down the Solomons chain into two
channels. The first European explorers to visit the island
reported an
abundance of food and the presence of a 1700' (520 meter) volcano
with
a five mile (eight kilometer) wide crater at the center of the
island. The last eruption of the volcano, which ended in 1850, was
characterized by pyroclastic flows that virtually swept the island
clean of life. The crater still had areas of boiling mud from
residual
heat in 1942.
Naval Historical Center #50346
Following the American landings at Guadalcanal and Tulagi on 7 August 1942, the commander of 8 Fleet, Mikawa Gunichi, resolved to strongly contest the landings. He hastily gathered a force of six transports and troops from Rabaul to reinforce the Guadalcanal garrison and sent an urgent message to his scattered cruiser force to reassemble. The transport force was recalled when its lead ship, transport Meiyo Maru, was torpedoed at midnight on August 8 by S-38. However, the cruiser force steamed out of Rabaul late on 7 August for Guadalcanal, where it would hand the U.S. Navy the worst defeat in its history, off Savo Island.
The Japanese force was composed of five heavy cruisers, two light cruisers, and a single destroyer. Defending the Allied beachhead was a force of six heavy cruisers, two light cruisers, and eight destroyers. However, the nominal Allied superiority in numbers was more than offset by superior Japanese night fighting tactics and training and the possession by the Japanese of the deadly Long Lance torpedo. Furthermore, the Allied force was caught by surprise, was scattered, and was effectively out of command when the Japanese force arrived.
The manner in which the Allies were caught by surprise illustrates the poor command arrangements and lack of experience of the Allied forces in the south and southwest Pacific. Mikawa's force was sighted almost as soon as it left port, by S-38, which was unable to attain attack position but radioed a contact report. The force was sighted a second time at 1026 on the morning of 8 August by an Australian Hudson patrol bomber, but the pilot mistook two of the ships for seaplane tenders and reported only three cruisers. (There was in fact a Japanese seaplane tender in the area, Akitsushima, headed more or less in the same direction as Mikawa's force.) Meanwhile, Mikawa's own floatplanes had carried out a thorough reconnaissance of the Allied forces off Tulagi.
The amphibious
force commander, Turner,
was expecting a Japanese reaction but had no intelligence on what form
it
might take. The Hudson that had sighted Mikawa's force was under MacArthur's Southwest
Pacific
headquarters, but Turner was under Ghormley's South
Pacific
headquarters. Turner's own Catalina
patrol aircraft,
operating from Ndeni,
were covering the sea lanes to Truk,
and the B-17s
from Espiritu Santo
assigned
to cover the Slot were operating at their extreme range and just
missed
sighting Mikawa's force. The Hudson that sighted Mikawa did not
break
radio
silence to make a report, and the pilot seemed in no hurry to
report
his sighting even after returning to base. As a result, Turner did
not
get the crucial sighting report until 1845 on 8 August. The
misidentification of the force composition led Turner to believe
that
the Japanese force was planning to set up a seaplane base at Rekata Bay, and no
special precautions against night surface attack were made.
Word of Mikawa's force reached Fletcher at the same time as Turner. Fletcher briefly considered launching an attack with the torpedo planes of VT-8 but was talked out of it by Saratoga's captain, who pointed out the hazards of attempting a night strike with crews lacking the necessary training. Fletcher no more expected the Japanese to press on that did Turner, and he was confident in any case that the Allied cruisers could take care of themselves in any surface action. Later that evening, Fletcher asked permission from Ghormley to withdraw his carrier task force, which was low on fuel and had suffered from worrisome attrition to its fighter squadrons. The myths that Fletcher withdrew before receiving Ghormley's permission, that he withdrew knowing a Japanese surface force was approaching Guadalcanal, or that his aircraft could have given warning had his carriers remained have been debunked by Lundstrom (2006).
Thus, Mikawa caught the Allies dispersed and unalerted. Turner had divided his cruisers and destroyers into three separate forces. The Northern Force covered the channel north of Savo Island; the Southern Force covered the channel south of Savo Island; and the Eastern Force covered the approaches to Tulagi from the east and did not join battle. Each of the two forces facing Mikawa was composed of just three cruisers and two destroyers, less than half the firepower of Mikawa's force, which invited defeat in detail. This is essentially what took place.
There were other mistakes, as well as some bad luck. Turner posted two destroyers equipped with SC radar west of the Northern and Southern Forces, but the radar would have been lucky to pick up a cruiser at ten miles under optimum conditions. The ships were at almost opposite ends of their patrol lines when the Japanese arrived, and the Japanese slipped neatly through the gap. The Japanese lookouts actually spotted one of the destroyers, which failed to detect the Japanese on radar. Reports of strange aircraft overhead (the Japanese cruiser floatplanes) were discounted as friendly aircraft. Finally, Turner called Crutchley, who was with the Southern Force, to meet with him off Tulagi to discuss what to do about the withdrawal of Fletcher's carriers. Crutchley chose to sail to the meeting in Australia, reducing the Southern Force to just two cruisers and two destroyers.
The result was that, when the Japanese came into the area, they achieved almost complete surprise. Patterson finally sighted the Japanese force when its lead ship had closed to just 5000 yards, but by then it was far too late; the Japanese had already launched salvos of Long Lance torpedoes, and at almost the moment Patterson broadcast her warning, the Japanese floatplanes illuminated the Allied force with flares. Canberra was hit by two torpedoes before she could train her turrets, and was finished with another 24 shell hits. Patterson was luckier, taking a single shell hit, but failing to get off her own torpedoes. Bagley got off her torpedoes but scored no hits. Chicago maneuvered sharply but was unable to avoid having her bow blown off by a torpedo. She also took a minor shell hit.
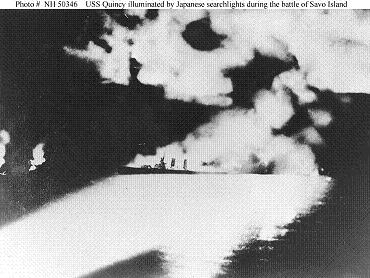
Mikawa then moved on to attack the Northern Force,
which, incredibly, had received no warning from the Southern
Force. Astoria got off a dozen
salvoes,
one shell hitting Chokai in
the chart room and another on a turret, before the American ship
was
shattered by a rain of shells. Quincy
was brightly illuminated by Japanese searchlights and got off only
a
couple of salvos before shell hits set fire to her floatplane,
shattered a turret, and set off a 5" gun magazine. A torpedo hit
flooded her machinery spaces, and she sank quickly. Vincennes managed to score a
hit on
Kinugasa, but, again, Japanese
shells set fire to her floatplanes and the ship became a target
for
gunfire and torpedoes. Vincennes
was hit by at least three torpedoes and numerous shells.
Now it was the Japanese turn for confusion and
error. Mikawa had scored a tremendous tactical victory, but seems
to
have been rattled by the hits on his flagship. His force was
scattered,
all his torpedoes were expended, and his flagship had ended up at
the
rear of his cruiser column. He also knew that daylight was
approaching
and,
believing that American carriers
were still in the area, withdrew without
attacking the transports. He likely did not wish to test his luck
any
further. It is also likely he believed that his mission had been
accomplished, in that the destruction of their screen would force
the
Americans to evacuate their forces. He may have hoped that his
rapid
withdrawal following such a stinging blow would draw the American
carriers after him into range of land-based aircraft.
As Mikawa withdrew,
his force encountered Ralph
Talbot
as she turned to the
west, and although the destroyer managed to get off four
torpedoes, she
was badly hit and forced to withdraw into a rain squall.
The Japanese had sunk four Allied cruisers and
severely damaged a fifth cruiser and a destroyer. Over a thousand
Allied sailors were killed
and
more than seven hundred others wounded.
The Japanese suffered only
light damage. The Americans drew slight consolation from
the
sinking of the Japanese cruiser Kako by an American submarine while returning to
Kavieng. Though the Allied
transports
were left untouched, the loss of the
cruiser cover forced Turner
to pull out the
transports after they had unloaded only
about half their stores. Turner made the gutsy decision to
continue unloading until noon on 9 August, but the Marines
on Guadalcanal were left with just four units of fire and 37 days'
supply of food, and they lived for a time off captured Japanese rice.
Turner successfully deflected blame for the
debacle towards Fletcher, whom Turner condemned for withdrawing
the
carriers at a crucial moment. The weight of evidence, however, is
that
it would have made no difference if Fletcher had stayed. Fletcher
did
not actually begin his withdrawal until the early hours of 9
August.
Mikawa's force was still over 150 miles distant from Fletcher at
sunset
on 8 August, which put Mikawa beyond dusk search range even had
Fletcher intuited a need for such a search. Communications were
still
fragmentary and Fletcher was not awakened to word of Allied
cruiser
losses off Savo until 0645 on 9 August, at which point he would
have
had little chance of launching even a retaliatory strike against
Mikawa's retreating force. Fletcher's withdrawal did prompt Turner
to
summon Crutchley to the midnight conference that left the cruiser
screen leaderless, but it is unclear why Crutchley needed to be
called
away from his command in this manner. Turner's skill at fixing
blame
elsewhere, together with his genuine courage in lingering to
unload a
few more crucial supplies on 9 August and his splendid combat
record
later in the war, were sufficient to let him escape serious
criticism.
| Elements,
8
Fleet (Mikawa)
|
||
| CA Chokai |
Lightly damaged |
|
| CA Aoba | Slightly damaged |
|
| CA Kako |
||
| CA Kinugasa | Very slightly damaged |
|
| CA Furutaka | ||
| CL Tenryu |
||
| CL Yubari |
||
| DD Yunagi |
||
| Support
Force
(Turner) |
|||
| Southern
Force
(Crutchley)
|
|||
| CA Australia |
Absent on orders |
||
| CA Chicago |
Heavily damaged |
||
| CA Canberra | Sunk |
||
| DD Patterson |
Moderately damaged |
||
| DD Bagley | |||
| Northern
Force |
|||
| CA Vincennes |
Sunk |
||
| CA Astoria | Sunk |
||
| CA Quincy | Sunk |
||
| DD Helm | |||
| DD Wilson | |||
| Eastern
Force
(Scott) |
Did not become involved in
the
battle |
||
| CLAA San
Juan |
|||
| CL Hobart |
|||
| DD Monssen |
|||
| DD Buchanan | |||
| Pickets |
|||
| DD Blue | |||
| DD Ralph
Talbot |
Heavily damaged |
||
| Transport
Force |
|||
| DD Selfridge | |||
| DD Mugford | |||
| DD Henley | |||
| DD Hull | |||
| DD Dewey | |||
| DD Ellet | |||
| 18 AP |
|||
References
VolcanoWorld (accessed 2008-2-7)
The Pacific War Online Encyclopedia © 2007-2008, 2010-2011 by Kent G. Budge. Index